How to Play
You command the blue army (top of the field). Your objective: defeat the red army (bottom). A side loses when it has no units left on the field — every one destroyed or fled clear of the map. A unit that is merely routing still counts: it’s off fighting for now, but the battle stays live while it’s still on the field, whether it’s “broken” (still able to rally) or has “shattered” (lost its nerve for good, but still has to either run for it or be run down before it’s actually gone).
Controls
| Action | Control |
|---|---|
| Select a unit | Left-click its block or its raised flag |
| Select multiple | Left-click and drag a box |
| Move | Right-click the ground |
| Form up | Right-click and drag open ground (left flank → right flank); with several units selected, the line is split among them. With Tray formation placement on, a multi-row or gapped tray layout deploys as that 2D grid instead |
| Form up in selection order | Shift + right-click and drag (instead of the default left-to-right field order) |
| Form-up split mode | Y cycles through enabled modes (equal-depth / equal-width); Shift + Y cycles the other way; configure which modes cycle and which is the battle default in ☰ Menu |
| Reform before move | A checkbox in the unit settings panel (bottom-left), or the control bar, toggles whether the selection pauses to settle its ranks before marching. Each unit type has its own default (on for most types, off for cavalry) |
| Walk advance | A checkbox in the unit settings panel (bottom-left) keeps the selection at walk speed throughout — no jog or sprint phase. Required for formed stances (shield wall, pike phalanx) that break on a run; spearmen default it on |
| File-major reform | A button in the unit settings panel (bottom-left) cycles how the selection’s grid reflows after a casualty: File-major closes the gap with a soldier’s own file (column) survivors (the default for every type), Row-major keeps every rank full, filling the back of a fallen man’s file from the rear rank, and Auto picks between the two from the unit’s own discipline (see Tactics) |
| Attack | Right-click an enemy unit |
| Group-order mode | X cycles focused ↔︎ distributed (Shift + X cycles the other way) · or control bar — spreads a multi-unit attack across nearby enemies, or a multi-unit relief across nearby engaged friendlies (passage of lines) |
| Relieve a friendly | Right-click an engaged friendly outside the selection — the fresh unit takes over the fight and the tired one falls back. With several fresh units selected and distributed mode on, each pairs with its own nearby engaged friendly instead of piling onto the one clicked |
| Add waypoint | Shift + Right-click (chain several move points) |
| Order stance | H hold · F flank · R rear · K skirmish · G support · J cycle charge · Esc clear |
| Set stance in place | Ctrl + a stance key writes that stance on the selection immediately — no move/attack order needed |
| Rank relief (discipline) | I toggles rank cycling for the selection (on by default; see Tactics) |
| Draw the other carried weapon | Shift+I re-equips the selection to the second weapon its soldiers carry, and back again. Only some troops carry a second one — legionaries deploy holding the gladius with a pilum stowed, spearmen carry a secondary sidearm blade beside their spear, and cavalry carry a lance sidearm beside their spatha (see Tactics) |
| Formation | T (cycles 0.9 m / 0.45 m locked / 1.8 m / 0.45 m Square on foot; cavalry shows 2 × 6 m / 1 × 3 m locked / 4 × 12 m on the same axis; Shift + T cycles the other way) · or control bar |
| Anti-cavalry square | O jumps straight to Square / orbis (press again to drop back to Normal) · or click 0.45 m Square in the control bar |
| Schiltron | Shift + O jumps straight to Schiltron, the harder-bracing anti-cavalry variant (press again to drop back to Normal) · or click 0.45 m Schiltron in the control bar |
| Shielded stances | L shield wall · U testudo (each toggles back to Normal) · or click 0.34 m Shield Wall / 0.27 m Testudo in the control bar menu |
| Line width | [ narrower · ] wider, or drag a flank grip |
| File-doubling | B explicatio (broader + shallower) · N duplicatio (narrower + deeper) · Shift+B / Ctrl+B anchored explicatio (right / left flank held fixed) |
| Drill turn in place | V about-face (180°) · Q quarter-turn left · E quarter-turn right |
| Turn and unfold (combo) | Shift+Q quarter-turn left then explicatio · Shift+E quarter-turn right then explicatio (the frontage doubles across the NEW facing) |
| Countermarch (exelismos) | Shift+V Choral/Persian (same ground) · Ctrl+V Macedonian (advance) · Ctrl+Shift+V Laconian (withdraw) |
| Wheel (hinge on a flank) | Z wheel left · C wheel right (swings 90° about the standing flank file) |
| Nudge (small step, holds facing) | ← side-step left · → side-step right · ↑ forward-step · ↓ back-step (a few metres each) |
| Disengage and step back | Ctrl + ↓ on a unit currently in melee: breaks contact and steps back a short distance, holding facing |
| Merge selected units | M |
| Reinforce a friendly (doubling numbers) | Shift + M arms insertion by files, Ctrl + Shift + M arms insertion by ranks; then right-click the friendly regiment to file into. The selection marches up behind it and its men step into the host’s files or ranks, widening or deepening the host (up to doubling for an equal-strength reserve — see Tactics). Esc clears the arm |
| Control groups | Ctrl + 0-9 bind · 0-9 recall. Binding a selection that’s exactly the combined membership of one or more other groups (no partial overlap, no extras) nests those groups under the new one, so recalling it always reflects whatever its nested groups currently hold |
| Delegate to AI subcommander | Ctrl+Shift + 0-9 hands the selection to AI subcommander group N (press again on the same selection to take it back); any explicit order to a delegated unit reclaims it immediately – see Tactics |
| Distance legend | ☰ Menu → Distance legend toggles the map-scale bar (top-left, on by default) |
| Order distance labels | ☰ Menu → Order distance labels toggles the metric distance shown on each order line in the hold-Space survey (on by default) |
| Unit speed labels | ☰ Menu → Unit speed labels shows each unit’s current speed in metres/second above it in the hold-Space survey (off by default) |
| Soldier IDs (selected unit, zoom in) | ☰ Menu → Soldier IDs (selected unit, zoom in) draws each soldier’s per-body index over a selected unit at figure LOD (zoomed in); a developer debug visual (off by default) |
| Engaged-soldier highlight | ☰ Menu → Engaged-soldier highlight tints a unit’s currently-engaged soldiers (the ones the sim actually treats as melee/contact candidates this tick) a distinct color, for every unit, at any zoom; a developer debug visual (off by default) |
| Position-anchor marker | ☰ Menu → Position-anchor marker draws a small dot at each unit’s position – the regiment’s own kinematic anchor point, distinct from any individual soldier; a developer debug visual (off by default) |
| Combat state rings | ☰ Menu → Combat state rings draws subtle coloured rings around units during combat (red for engaged, orange for routing; on by default) |
| Frame rate | ☰ Menu → Show frame rate toggles a counter showing render FPS and the live simulation tick rate (ticks/s, which reads below the 60 Hz target if a large battle can’t keep up); ☰ Menu → Frame rate corner… picks which screen corner it renders in (top-left by default, off by default) |
| Unit card tray | F1 or the Tray button beside ☰ Menu (or ☰ Menu → Unit card tray) shows a panel for organizing your units into named battle lines. Each line is a fixed-width grid of cells (+ Line/- Line and + Column/- Column resize it) – a cell can be empty, so a line can leave gaps for a quincunx/checkerboard-style offset against the line below it. Drag a card onto another cell to swap the two (an empty target cell just moves the card there), or use its arrow buttons for the same moves – a lone unit always has an empty neighbor cell to shift into. Click a line’s name to select every unit in it at once. Check Tray formation placement to deploy that grid onto the field with a form-up drag (Line 1 = front rank; see Deploy from the unit card tray) |
| Pan camera | WASD / arrow keys / screen edges (all four arrows nudge instead while a unit is selected; WASD always pans) |
| Zoom | Mouse wheel |
| Show all orders + formation preview | hold Space |
| Active pause | P (or Shift + Space) |
| Slow motion (100% → 50% → 25% → 10%, Shift reverses) | F5 |
| Fog of war | F7 or ☰ Menu → Fog of war hides every enemy unit outside your own units’ sight radii and leaves a fading ghost outline where each was last seen. A “FOG OF WAR” indicator shows while it’s on (off by default) – see Fog of war |
| All shortcuts (this list, in-game) | ? (Shift + /) or ☰ Menu → Shortcuts |
| Quit to Main Menu | ☰ Menu → Quit to Main Menu leaves the battle immediately and returns to the Main Menu — the only way out of a Parade Ground drill, which never auto-ends |
A right-click on empty ground is a move order; a right-click on an enemy is an attack order. Melee then resolves per soldier: a small unit is not erased in one tick the moment the two blocks’ centres enter weapon range – men have to actually be in reach, and both sides can hit back. Selection and camera stay live even while paused, so you can plan under pressure.
Control bar. When you have units selected, a control bar appears at the bottom of the screen with clickable buttons for the most-used unit toggles. Use it as a mouse-driven alternative to the hotkeys whenever you prefer clicking to typing.
- Formation — click 0.9 m, 0.45 m locked, 1.8 m, or 0.45 m Square (same as T), or pick one of the other direct-select stances: 0.45 m Schiltron (Shift + O, the harder-bracing anti-cavalry variant), 0.34 m Shield Wall (L), or 0.27 m Testudo (U). The button shows the selected unit’s live slot-center pitch in metres — cavalry reads 2 × 6 m at Normal (file then rank), 1 × 3 m locked at Tight, 4 × 12 m at Loose on that same identity, not a second scale. T cycles only the density set plus Square; the other three stances are set from the menu or their direct keys.
- Stance — click any order stance to arm it for your next right-click order (same as the stance hotkeys; Esc / the Normal button clears it).
- Reform — toggle Reform before move for the selected unit(s) (same as the checkbox in the unit settings panel).
- Focused / Spread — cycle the group-order mode (same as X); governs both a multi-unit attack and a multi-unit relief.
The bar updates immediately when you select a different unit or change a setting elsewhere.
Control groups can nest. Binding a selection that’s exactly the combined membership of one or more other groups — no partial overlap, no extra units — records the new group as a composite over those groups instead of a frozen snapshot. Recalling it always reflects whatever its nested groups currently hold: rebind one of the nested groups later, and the parent’s next recall picks up the change automatically. A selection that doesn’t cleanly decompose this way (a partial overlap with a bound group, or extra units alongside a match) just binds as an ordinary flat group, exactly as before.
Pace modes (AUTO by default). Units walk on approach, jog when a ranged enemy is within range (under missile fire), and accelerate to full sprint speed once within about 10 m of the target — preserving stamina on the approach walk and spending it only on the terminal charge (or when jogging under fire or pursuing). Check Walk advance in the unit settings panel to lock the selection to walk pace throughout; this is required for formed stances like shield wall or pike phalanx that break if the unit breaks into a run. Each unit type has its own default — spearmen start with it on, everyone else off — and the setting persists per unit until you (or a replayed order) change it again.
Move order sequence. When you right-click a destination, the regiment turns to face it and marches there in good order: it pivots about its centre onto the new heading — turning in place before it advances on a sharp turn — then marches, and settles back into formation on arrival. While it marches, the info panel reports how far it is to the destination it is heading for, and in which direction — “Moving 45 m north-east”, with north at the top of the screen — followed by how many queued waypoints come after it, such as “(+2 waypoints)”. It reads “Arriving” in the last half metre of the final leg. The next two sections cover the special cases: a small sideways shift (side-step) and a larger turn (centre pivot).
Disciplined vs. undisciplined units. The centre-pivot march above is what a disciplined (trained, professional) unit executes. An undisciplined unit — a levy or mob — skips it: it turns to face its destination immediately and walks there directly, re-forming as its soldiers arrive rather than turning as one formed body. A disciplined unit given an in-haste order — a triple- or quadruple-click move, i.e. run or sprint pace — marches the same undisciplined way for that order: there’s no time to execute a formed turn at a dead run.
Reform before move (default on for most types). By default, a fresh move order makes a unit hold its position briefly (~0.8 s) while its ranks settle into formation before it steps off. The unit spends this hold pivoting in place toward the destination — no faster than its corner man can run, so the ranks hold their dressing — and its ranks are already coming onto the new heading before the first step. For a unit already on the march, the hold is also the brake leg of a sharp turn: a fresh order that roughly continues the current travel carries the column’s momentum straight through, while one that turns it sharply back bleeds that speed off during the hold, so the block comes about from a stand instead of carrying its pace into the turn (Figure 4). Men still walking to their places when the block steps off on a move order (yours, or one the AI gives) or a withdrawal out of a fight keep closing on them while the march changes: whenever the block speeds up, or swings its heading without slowing, each man well off his place may change his own speed and direction at his usual rate plus the rate the march is changing at (that extra is capped at his usual rate). The extra keeps him level with his moving place and his usual rate still closes on it, so he gains on his place instead of only keeping pace with it, though he still walks onto it no faster than his usual jog. A march that slows gives none. Only those orderly marches give that extra acceleration. A combat approach — the march of an attack or support order, a charge or a pursuit — gives none, and neither does an in-haste move order (a triple- or quadruple-click) or a rout. On every march, the way a man walks onto his place changes over gradually as the block gets under way rather than all at once on its first step (Figure 5). A block that halts in a fight and marches off straight from it takes the change-over up where it left off, so its men, thrown about by the fight, go back to their places as they did before the block halted. Once that change-over is complete, a man within about four and a half file widths of his place walks straight to it; while the block is still getting under way, his way there is a blend of that straight walk and the way he would take if the block stood still, which can lead round the outside of the block. One farther off whose way back crosses both the block’s files and its ranks may still be sent round the outside of the block, as on any march. To make a unit move immediately without the reform hold, uncheck Reform before move in its unit settings panel, or click Reform in the control bar — either applies to every currently selected unit. Cavalry starts with the setting off (immediate responsiveness matters more to a mounted regiment than settling ranks); every other type starts with it on. The setting is a persistent property of each unit, and any mid-battle toggle is itself recorded, so replays reproduce whichever mode was active at the moment you issued each order.
Side-step (small lateral moves). A move order that only shifts a unit a short way to the side — less than about its own width — is carried out as a side-step: the unit shuffles sideways at a walk while holding its current facing, instead of pivoting the whole line round to face the move and then pivoting back. So a small dressing of the line keeps every soldier looking the same way and keeps the ranks in order. A move that heads forward still turns to face the destination and marches normally; a longer move to the side is a lateral pivot instead, covered below.
Back-step (short moves to the rear). The same short-distance exception applies behind the unit: a move order that only shifts it a short way straight back is a back-step — it shuffles backward at a walk while holding its facing, the same nudge as the ↓ arrow key below. A longer move into the rear arc is a real repositioning march instead, covered next.
Arrow-key nudges. With a unit selected, the arrow keys order a small fixed step without touching the mouse: ← and → side-step the unit a few metres to that side, ↑ steps it forward, and ↓ back-steps it a few metres straight to the rear. All four hold the unit’s facing — a nudge shuffles it into place, it never turns to face the step. Use them to dress a line, open a gap, close up a short distance, or edge a regiment off a bad spot. While a unit is selected these four arrows nudge instead of panning the camera; WASD still pans, so you never lose camera control.
Disengage and step back (Ctrl + ↓). The plain back-step nudge above refuses to fire on a unit currently in melee — a drill step shouldn’t yank a regiment out of a fight by accident. Ctrl + ↓ is the deliberate, combat-legal version: it breaks contact and steps the unit back a short distance, holding facing the same way. A controlled withdrawal to reset spacing, not a retreat — but it isn’t free: the enemy’s own attack keeps landing hits (with the flank/rear bonus) for as long as it can still reach you, so the fight has to actually be worth walking away from.
A right-click move that would walk a regiment through an enemy it is not fighting still arrests at contact — the men cannot occupy the same ground, so go around or wait for a gap.
Centre pivot (larger turns). A move order that turns a unit toward a new heading makes it pivot about its centre there gradually rather than snapping — it turns toward its travel direction in good order as it sets off. When the heading change is sharp, the unit pivots before it advances: it nearly halts, comes onto its new facing, then marches. So a unit always marches facing its destination, and never reverses into it. (A chasing or charging unit still turns instantly — the gradual pivot is for your own move orders, where order matters more than the last fraction of a second.)
Move to the rear (about-face, reform, then march). A longer move order to a destination roughly behind the unit (more than 135° off its facing) is not a centre pivot at all: the regiment first performs the standing about-face (conversio, below) — every soldier reverses 180° where they stand, the front rank becoming the rear rank man-for-man — and then marches to the destination facing it. The block keeps its footprint the whole time rather than swinging the whole line round about its centre, so a unit sent to the rear turns about cleanly and steps off, never sliding backwards.
Because the flip makes the old rear rank the new front, a unit that has taken losses would otherwise lead with its thinnest rank — the short, under-strength rank that had been tucked safely at the back. So after the turn the regiment reforms: the men re-square without marching through the block, dressing the line without countermarching. Most of the block stands fast on the ground it holds, through the turn and the reform alike. In a block that reforms file by file, only the files the short rank never reached step forward one place to close the new front. In one that reforms by rows (cavalry always does, and so does foot whose Reform button is set to Row-major, or to Auto when it is not disciplined), only the few men with no counterpart across the flip keep their file and swap ends. Each of those men is given a path out round his own flank, clear of the block’s widest rank, rather than through the men standing fast. A squared block reforms the same way. In a block that reforms by rows, a loss taken while the men walk does not change which of them are sent round. The reform keeps every man on the flank he stood on, and the orders after it do not swap the men to the opposite flanks. With Reform before move on (the default) this happens before the unit steps off; with it off, the unit marches at once — short rank leading — and reforms on arrival instead.
Move to the rear, oblique (about-face, flank pivot, then march). When that rear-sector destination is oblique enough — more than about 30° off the reversed heading — the about-face’s own 180° reversal alone would still leave a sizeable turn uncorrected. For a move that oblique, the regiment adds one more standing step before it marches: once the about-face completes, it flank-pivots (wheels) the rest of the way onto the destination’s bearing — the same hinge swing as the Z/C drill below, just chained in automatically — and only then steps off, already lined up on its destination instead of leaving the last of the turn to the march’s own gradual centre pivot.
Lateral pivot (quarter-turn, file march, quarter-turn back). A longer move order to one side — too far to side-step, but not far enough off-facing to count as behind the unit — is a file march: the regiment quarter-turns toward the destination’s side in place, marches straight there keeping its pre-turn footprint the whole way (the block never reforms to face the new heading, so a wide line stays wide instead of narrowing into a column), and then quarter-turns back to its original facing once it arrives. The unit ends up facing exactly the way it started — the reorientation is temporary, for the march only, not a permanent repointing of the whole regiment.
About-face in place (conversio, V). Press V with a unit selected to issue the conversio: every soldier reverses 180° where they stand — the file/rank grid stays put, the front rank becomes the rear rank man-for-man, and the unit is now facing the other way. Unlike the gradual centre pivot that accompanies a move order (which rotates the whole block around its centre as it marches), the conversio is a standing drill command: no one takes a step. Use it to face a threat behind the line without marching first, or to quickly reorient a reserve before it moves up.
When the about-faced unit next moves off, it squares its ranks to the new heading in place, unless it has turned to face an enemy since: each man keeps his own flank. If the old rear rank was short, it now leads, and a full rank is brought to the front. In a block that reforms file by file, the files the short rank never reached step forward one place. In one that reforms by rows (cavalry always does, and the panel’s Reform button can choose it for foot), some men of the old front rank instead walk the depth of the block to fill the new front. A block with no short rank needs no step at all. The same holds when the block was skewed by less than a right angle before the turn, such as a levy still skewed from snapping round onto earlier orders: the men also turn through that skew about the block’s centre as it squares, which carries the men farthest from the centre a little way round. A block skewed by more than a right angle is instead swung the shorter way round to its new heading. Two quarter-turns the same way count as an about-face here too.
Quarter-turn in place (Q / E). Press Q to turn the selected unit a quarter-turn left, or E to turn it right: every soldier pivots 90° where they stand. No one marches and the grid of men does not reorganize — they simply face the new way, so the block now presents its short edge as its frontage (its frontage and depth swap relative to the facing, without anyone moving). Like the conversio, it is a standing facing change. Use it to throw a fresh face toward a flank, or as the first step of marching off to the side in good order.
A move order given to a quarter-turned unit squares it back to its heading first: the block takes its usual frontage across the direction it now faces, and each man steps into the new place nearest where he stands, so nobody crosses the block to get there. That holds even when the block was not square to its heading before the turn, such as a levy still skewed from snapping round onto an earlier order.
Turn and unfold (Shift+Q / Shift+E). The first chained drill: one press runs a quarter-turn and then an explicatio, back to back, as a single order. Press Shift+Q to turn the selected unit a quarter-turn left, or Shift+E to turn it right, exactly as the plain key does — and the instant the turn completes, the block doubles the frontage it now presents: the rear half of each file steps out sideways across the new facing, so the depth halves and the line broadens. The explicatio is measured against the direction the men face after the turn, not the grid they started in — which is what makes the pair one drill rather than two unrelated keypresses (pressing Q and then B by hand doubles the grid’s old files, which after the turn run along the block’s depth). A block skewed by less than half a right angle before the turn, or by more than one and a half (nearly reversed), still unfolds across its new facing, and the skew is squared away with it. One skewed in between ends the turn with its files nearer across its new facing than along it, so it widens those files where they lie and keeps its skew. The historical use is deploying from column: a regiment marching by files quarter-turns to bring its long side to the front, then unfolds into line. The panel reads “Quarter-turning (step 1 of 2)” while the turn runs. Like every drill, it only answers a unit standing idle.
Wheel on a flank (circumductio, Z / C). Press Z to wheel the selected unit left, or C to wheel it right. One end of the line — the standing flank file — holds its ground while the rest of the block swings around it like a door on a hinge, reorienting the whole line 90° while every man keeps his place in the ranks. Unlike the quarter-turn, this is not a standing facing change: the far flank actually marches an arc, so the line ends up facing a new direction and lying along a new line. The swing is paced by the outer file — the corner man farthest from the hinge jogs his arc while the inner files slow proportionally — so a wide or deep block takes correspondingly longer to come around. Use it to refuse a flank, to swing a wing forward and take an enemy line in the side, or to change the front an entire wing presents without breaking its order.
Moving wheel (cavalry only). A mounted regiment doesn’t need to halt for any of the standing maneuvers above. Give a cavalry unit a move order sharply off its current heading — forward-oblique, to a flank, or to the rear, at any angle, even one that would otherwise call for a full about-face — and it gallops through the turn in a single continuous wheel: the hinge advances at the unit’s own march pace the whole swing while the outer files sweep faster to keep the line’s shape, then it rides straight into the march with no halt at either end. A foot regiment given the identical order still takes the standing route above — an about-face, an about-face plus flank pivot, or a lateral pivot, depending on the angle — since only cavalry is fast and maneuverable enough to carve the turn without breaking stride. The same choice applies whether the order comes from your own click or from an AI subcommander’s directive (a “hold this ground” / “cover this flank” order): a subcommander leading a cavalry group from the front can decompose its own directive into the same moving wheel followed by a forward march.
Countermarch (exelismos, Shift+V / Ctrl+V / Ctrl+Shift+V). All three variants share the about-face’s V key, the same way Shift+O shares O with the anti-cavalry square — every plain letter hotkey is already claimed elsewhere. Unlike the conversio (every man turns in place, keeping his own spot) or the wheel (a hinge swing on one flank), a countermarch reverses which end of the line faces the enemy by marching files through and around each other: the files countermarch past their own file-mates so a genuine full-strength rank always ends up leading, instead of whichever partial or depleted rank happened to be trailing after a plain about-face. The three historical variants (Asclepiodotus, Tactica 10; Aelian, Tactica Theoria 27–28) differ only in where the whole regiment ends up:
- Shift+V Choral/Persian — reverses facing on the very ground the unit already stands on, the in-place counterpart to the conversio.
- Ctrl+V Macedonian — reverses facing and advances, roughly one file’s depth onto new ground. Use it to meet a fresh threat that has appeared behind the line.
- Ctrl+Shift+V Laconian — reverses facing and withdraws, roughly one file’s depth back. A controlled disengagement that cedes ground instead of gaining it.
All four drills fire from a standstill only: a unit that is marching, fighting, or already mid-maneuver ignores the key press. While one runs, the info panel reports it (“About-facing”, “Quarter-turning”, “Wheeling”, “Countermarching (Macedonian)”), and any fresh order cancels the drill where it stands.
Zoom in to see the soldiers. From the usual overview each regiment is a block of small marks. Zoom in far enough and those marks become individual figures, and each type carries its own gear — spearmen shoulder a spear, archers carry a bow, other foot raise a shield, and cavalry ride a mount that faces the regiment’s march. So you can watch the ranks as people, not dots, and still read who is who. A small white facing pip on each figure shows its exact facing — the figure itself only mirrors left/right, so the pip is what lets a maneuver’s precise turn (a quarter-turn, say) read correctly even at this zoom, not just a coarse left/right flip. Zoom back out and they collapse to the legible marks again — each mark points the way its soldier faces, so you can read a regiment’s facing at a glance even from the overview. The mark shape tells you the type, too: a dart for spearmen, a kite for archers, and an arrow-pointer for other foot and cavalry. All three are compact directional glyphs, so a rank reads as arrows whichever way it faces rather than smearing into bars.
Reading distances. A small semi-translucent scale bar sits in the top-left corner, labelled with the real metre distance it spans (e.g. “50 m”) — it rescales as you zoom, so you can always judge range and reach at a glance. Toggle it off in ☰ Menu → Distance legend if you’d rather not see it.
Order stances. Beyond plain move/attack you can arm a stance with a hotkey before you click; a coloured cursor shows which is active, and Esc clears it.
Hold (H) — stand ground; don’t chase a detected enemy.
Attack flank (F) / Attack rear (R) — maneuver to strike the enemy’s side or back, where hits land far harder (see Tactics).
Skirmish (K) — a ranged unit keeps its distance, backing off when a threat closes instead of standing to fire. Kite distance and auto-acquisition scale to the weapon’s missile profile reach (see Tactics).
Support (G) — right-click a friendly to guard it: the unit shadows that ally and engages anything that threatens it.
Cycle charge (J) — cavalry charge the target, pull back to a standoff, and charge again, so each run lands a fresh momentum hit instead of grinding once the charge is spent (see Tactics).
Sweep routers (,) — the unit prioritizes a routing (fleeing) enemy over a closer enemy that’s still standing and fighting, chasing down the break before mopping up the line (see Tactics).
Roll the line (;) — once the current target routs or is destroyed, the unit automatically re-targets the next-closest enemy still fighting instead of standing idle or chasing a broken foe, so a single attack order can carry a unit down a whole enemy line (see Tactics).
Pin down (.) — stall an enemy confronted head-on: the unit swings less often than normal, but each swing’s follow-through briefly leaves it more exposed to a hit — a genuine tradeoff, not a pure defensive buff (see Tactics).
All-out attack (’) — trade defense for offense: the unit hits harder but is itself easier to hit, so both sides in the exchange take more casualties than a fair fight would (see Tactics).
Chase (\) — relentless pursuit: the unit never takes the normal disengage exit a plain move order gives it, so it keeps closing on and re-engaging the same fleeing or repositioning enemy instead of breaking off (see Tactics).
Wedge charge (-) — trade defense and stamina for a faster approach: the unit closes the distance quicker, but is itself easier to hit and tires faster while fighting (see Tactics).
Knockback focus (=) — trade damage for a much bigger, more probable push-back. Hold Shift when arming or issuing it to push the struck enemy much further back instead of just clearing the battle line (see Tactics).
Pressing a stance key alone only arms it for your next move/attack order — it doesn’t touch a unit that’s already standing still. To change a selected unit’s stance right where it stands, with no move needed, hold Ctrl while pressing the stance key; a toast confirms the write. Arming a new stance before Shift+right-clicking to queue a waypoint stamps that stance onto just the newly queued leg — it takes effect once the unit’s route reaches that leg, without touching whatever stance is already active on the leg the unit is currently marching. Separately, I toggles each selected unit’s rank relief (discipline) mode — the on-by-default knob behind rank cycling (see Tactics) — with its own confirming toast.
Relieve a fighting friendly (line relief). Right-click an engaged friendly outside your selection to order a relief: the fresh unit advances into the fight and the tired one peels back toward its own rear to rest. The two regiments pass through each other during the swap — that is unit-level interpenetration so the line never opens a company-sized hole, not files spreading apart. Tight files (0.45 m on foot, 1 m knee-to-knee on horse) stay packed; a block whose derived file gap is already open (0.9 m Normal or 1.8 m Loose on foot; 2 × 6 m or 4 × 12 m cavalry) widens a lane between files — and only in the ranks the partner is marching through. The reliever takes over the melee, and the relieved unit’s retreat is a real move order, so holding Space shows it like any other march. The relieved regiment backs out facing the enemy rather than turning its back on the line it just left, so it keeps its ranks square the whole way out. Any fresh order to the reliever cancels the swap where it stands. Relief is how you win a long grind — see Tactics.
Relieve a whole tired line at once (passage of lines). Select every fresh unit in your reserve, switch the group-order mode to Distributed (X or the control bar), then right-click any one engaged unit in the tired line. Instead of every reliever swapping with just the unit you clicked, each pairs with its own nearby engaged friendly — the whole reserve passes through the whole tired line in one order. See Tactics for how the pairing is chosen.
Press T to cycle a selected unit’s formation density — the control bar names each mode by its live slot-center pitch in metres (the interval includes the man or horse; it is not empty air between bodies). On foot that is 0.9 m (pyknosis, the default fighting order), 0.45 m locked (Tight: synaspismos with Tight’s missile and charge bonuses), 1.8 m (true open order, the marching / file-relief density), and 0.45 m Square (the anti-cavalry ring described below). Tight is the packed floor; there is no historically grounded room below synaspismos except Shield Wall / Testudo. Every unit can cycle through all four; each type just starts at a different one — spearmen deploy locked (0.45 m locked against a charge), archers deploy at 1.8 m (room to fire), and sword-armed infantry and cavalry deploy at Normal (0.9 m on foot, 2 × 6 m on horse).
The grid each density mode scales is itself per-type, on that same centre-pitch identity: foot Tight is isotropic at 0.45 m on both axes, while a cavalry regiment’s Tight grid is anisotropic — 1 m between files (one horse-width, derived side gap ~0, knee-to-knee) and 3 m between ranks (Aelian: horse length ~3× shoulder width; Asclepiodotus 7.4: Greeks doubled the interval between riders so an 8-deep × 16-front block still looked square). Cavalry has no separate spacing metric: T walks the same option set, scaling both axes 2x at Normal (2 m files / 6 m ranks) and 4x at Loose (4 m files / 12 m ranks). A mounted regiment therefore occupies several times the ground of a foot block with the same headcount, and its deep column takes visibly longer to wheel or pivot.
Square: orbis and schiltron (anti-cavalry rings). Square forms a hollow square: the soldiers face spears and shields outward on every side, so the unit has no weak flank or rear — an attack from any direction lands as if it were frontal, and a cavalry charge into the ring is braced (and backfires) no matter which side it hits. The ring is visible at a glance from the individual soldiers’ own outward-facing marks around the block’s perimeter — no separate overlay drawn on top. The price is mobility (the ring crawls) and offence (it hits softer while hunkered), so square up before the horse arrives and drop back to Normal once the threat is gone. There are two variants of the ring, trading off differently:
- Orbis — the last-stand ring. Its offence and charge-bracing sit at the square’s baseline, and it holds its nerve better than any other stance: casualties erode its morale more slowly, so a surrounded unit making a final stand is less likely to break outright. Because it’s a reaction you want to trigger fast, O (for orbis) jumps a unit straight to Square without cycling through Tight and Loose — press it again to drop back to Normal — and the control bar’s 0.45 m Square button does the same with one click.
- Schiltron — the cavalry specialist. A denser hedge of levelled spears braces a charge harder than the orbis does, so cavalry that rides into a schiltron comes off worse than riding into an orbis, at the cost of hitting even softer in return. It carries no morale bonus — unlike orbis this isn’t a last-stand stance, just the hard anti-cavalry counter. Shift + O jumps a unit straight to Schiltron — press it again to drop back to Normal — and the control bar’s 0.45 m Schiltron button does the same.
Shielded close-order stances. Two heavier stances build on Tight’s locked-shield density, chosen from the control-bar Formation menu:
- Shield Wall — shields locked edge-to-edge in a static line. It sharply cuts frontal missile and melee damage, but only to the front: a shot or blow into the flank or rear bypasses the wall entirely. The wall barely moves, so it is a holding stance — plant it to anchor a line, not to advance.
- Testudo — shields locked front, sides, and overhead. It blunts missile fire from every direction, the strongest arrow cover in the game, but the men are packed head-down under their shields and fight weakly, and it is the slowest stance of all. Use it to walk a unit across open ground under heavy archery, then drop back to a fighting formation before you close.
Both stances show their own footprint on the map, so you can read a unit’s stance directly from how the soldiers stand: a shield wall packs into a tight edge-to-edge line, and a testudo packs into a dense, deep block (the turtle) — no separate schematic drawn on top, just the real, physical formation geometry.
Resize the line. A regiment normally forms up at a sensible width, but you can reshape it: press ] to widen the line by one file (shallower, more men fighting at the front) or [ to narrow it (deeper, fewer up front but more staying power). With a single unit selected, two small grips appear on its flanks — drag a grip in or out to set the width directly, with a live preview of the new file count. The drag anchors the far flank: only the dragged edge moves, like resizing a window by its edge, so you can extend a line toward the flank you care about while the other edge holds its ground (the [ / ] keys stay symmetric about the centre). The width holds as the unit takes casualties, and shows in the info panel. Where a grip lies over another of your units drawn up close beside it, clicking on that unit’s men, block or standard selects that unit; clicking the grip in the gap just outside them still grabs it. The width keys and file doubling wait while you hold a grip, and a grip nudged and let go leaves the width as it was.
File-major reform (default File-major). By default, each soldier keeps a persistent file (column) assignment: when a file-mate falls, only the survivors deeper in that SAME file step forward to close the gap, and every other file stands untouched — a mauled unit’s rear reads as jagged (one column can run deeper than its neighbour) rather than a single evenly-shrinking rear rank. Click the File-major reform button in the unit settings panel to cycle to Row-major, which keeps every rank full instead: the men behind a fallen man step up in his file, and the short rear rank sends a man forward to fill the back of that file (see Tactics). A third click cycles to Auto, which picks File-major or Row-major for you from the unit’s own discipline: a disciplined, professional regiment reflows File-major, an undisciplined mob reflows Row-major — useful for a mixed army where you’d otherwise have to set each unit by hand to match its own training.
File-doubling (explicatio and duplicatio). Where [ / ] nudge the width one file at a time, these two drill maneuvers reshape it by a whole factor at once. Press B for explicatio: each file splits and the rear half steps out to the side, so the frontage doubles and the depth halves — a column unfolds into a broad line that brings more men to the front, good for overlapping a flank. Press N for duplicatio: alternate files tuck in behind their neighbours, so the frontage halves and the depth doubles — a wide line folds into a deep, narrow column, good for punching through or squeezing down a lane. Nobody teleports: the soldiers walk to their new slots, so the reshape takes a moment to settle. Explicatio can’t widen past a single rank, and duplicatio bottoms out at one file.
Anchored (asymmetric) explicatio. The plain explicatio above widens symmetrically about the unit’s own centre — both flanks step outward by the same amount. Press Shift+B to widen instead while holding the right flank fixed, or Ctrl+B to hold the left flank fixed: the whole widen lands on the opposite side, so the unit’s position on the field shifts rather than staying centred. Useful when a flank must stay pinned to terrain or a neighbouring unit while the line still needs to broaden.
Deploy with a drag (form up). With a single unit selected, right-click and drag across open ground to lay out where it should stand: the start of the drag is the unit’s left flank, the end is its right flank. The unit marches over and pivots to face the line — the drag sets its position, width, and facing in one gesture, with a live preview of the front line and a forward arrow. A short right-click (no drag) is still a plain move.
Deploy several units at once. Select multiple units first, then drag the same flank line: it’s split into one contiguous slice per unit, with a small gap between them. The split can hold either depth (front-to-back ranks) or width (frontage) equal across the units, and can measure “equal” either by space (physical world units, accounting for each unit’s own density) or by count (a plain rank/file number, blind to density) — four combinations in all:
- Equal depth (space) — the default. Every regiment forms up to the same physical depth: a tightly-packed unit fits more ranks into that depth than a loosely-spread one, so the whole front reads as one uniform wall front-to-back.
- Equal depth (count) — every regiment gets the same number of ranks regardless of density, so a loosely-spread unit ends up physically deeper than a tightly-packed one at the same rank count.
- Equal width (space) — every unit takes the same physical frontage; a smaller unit just stacks deeper to fit its slice.
- Equal width (count) — every unit gets the same file count (soldiers per rank), so physical frontage differs when density does.
For a same-density group (every selected unit in the same stance) the space and count variants of a given dimension produce identical results — the distinction only matters when you drag a mixed group (e.g. a Tight unit alongside a Loose one). Press Y to cycle through the enabled modes and Shift+Y to cycle backward; the choice you make in ☰ Menu → Form-up sets the default each battle starts with, and which modes the Y-key cycles through. By default the units fill the line left-to-right by where they already stand, so each marches to the nearest slice without crossing a neighbour; hold Shift while you drag to place them in selection order instead (the first unit you picked takes the left flank). The preview shows every unit’s slice, file count, and the active split mode before you release.
Checkerboard (quincunx). A fifth split mode, off by default (enable it in ☰ Menu → Form-up): instead of one straight line, your selection alternates into two staggered rows — the historical Roman acies triplex arrangement. The 1st, 3rd, 5th, … units (by field position) form the front row along the dragged line, with wider gaps between them (roughly each unit’s own frontage, not the ordinary small seam). The 2nd, 4th, … units form a rear row, each centred laterally on one of the front row’s gaps and standing a short distance behind it. See tactics: acies triplex for why you’d want this.
Echelon (oblique order). Two more split modes, off by default (enable Echelon (right leads) or Echelon (left leads) in ☰ Menu → Form-up): instead of one straight rank, your selection staggers into a diagonal, one flank advanced and the other held back. Right leads puts the unit nearest your drag’s right flank furthest forward and the left-flank unit furthest back; left leads mirrors it. Every unit in between steps evenly between the two ends. See tactics: echelon (oblique order) for when you’d want a refused flank instead of a solid line.
Deploy from the unit card tray
The tray is not only an organizer – with Tray formation placement checked (in the tray header; off by default), a form-up drag deploys the selection in the tray’s own 2D grid. Line 1 is the front rank (on the dragged line), later lines sit behind it, columns run left-to-right along the drag, and empty cells become real gaps on the field. Rank-to-rank spacing comes from each line’s own formation depth, so stacked blocks cannot overlap. A single filled line still only reorders left-to-right and then splits by the live Form-up mode (equal-depth, checkerboard, echelon, …) – the 2D path kicks in once the layout has more than one row, or a gap inside the occupied cells.
This is distinct from the Checkerboard (quincunx) Form-up split, which alternates the selection by index into two rows and ignores the tray. Tray gaps are the ones you drew; checkerboard gaps are computed. Check tactics: tray formation for when you’d want one versus the other.
Survey all orders (hold Space). Holding Space overlays every unit’s current order on the battlefield: a dashed green line to each move destination, a red line to each attack target, and a teal link for support duties. At the end of each move line, a ghost formation (faint green dots) shows exactly where each individual soldier will stand when the regiment finishes its march — so you can check whether units will fit, overlap, or leave a gap before they arrive. The ghost reads the destination stance’s actual shape, so a unit marching in Square (or Schiltron) previews as the real hollow-square footprint, not the wide line the other formations use.
Each order line also carries a distance label at its midpoint, in the same metres the scale bar uses — the remaining march for a move (the full route, summed over any waypoints), or the range to the target for an attack or support link. The number counts down as the unit closes. Toggle the labels off in ☰ Menu → Order distance labels (on by default).
Slow motion. F5 cycles a slow-motion tick-speed mode — 100% (normal) -> 50% -> 25% -> 10%, wrapping back to normal; Shift + F5 cycles the other way. A persistent “N% SPEED” indicator shows below the order-mode banner whenever it’s active. This slows the same simulation down rather than switching to a separate playback mode, so it works during a live battle exactly as it does for a replay — useful for watching a knockback exchange, a formation reflow, or a multi-target melee resolution play out tick by tick instead of compressed into a blink.
Fog of war
F7 (or ☰ Menu → Fog of war) switches fog of war on and off. It is off by default, so a battle looks exactly as before until you ask for it. With fog on, each of your units sees a disc around itself — 15 m for foot, 18 m for ranged units (archers and skirmishers), 21 m for cavalry on the default field — and an enemy unit whose center lies outside every one of those discs is not drawn. Your own units are always visible. An enemy you have seen and then lost leaves a ghost outline in its team color at the spot and facing it was last seen, fading over the next ten seconds. A standing “FOG OF WAR” indicator sits below the order-mode banner while fog is on. Fog affects what is drawn and leaves ghost markers. It does not alter the retreat boundary, and melee combat already underway is unaffected: a soldier already in melee contact keeps fighting whoever is there, fog or no fog — true whether the fight is close enough to resolve soldier by soldier or has zoomed out to a far-tier exchange between the two formations as a whole — but that exemption is melee only, not “in weapon range” generally; a unit still at standoff distance, even one well within its own missile range, is a separate case (see below) regardless of tier: a volley re-checks whether the target is still sighted on every exchange, even one it was already trading fire with. The enemy AI’s own decisions honor the same fog you see when picking a FRESH target, though: an AI side can’t engage, or auto-march toward, an enemy none of its own units currently perceives, and reacts on the first AI decision after one of them does — the same visibility rules driving your own view, never an omniscient shortcut. This is not only an enemy-AI rule: it applies to YOUR OWN units too, wherever the game would otherwise auto-engage or auto-acquire a fresh target on your behalf. An idle ranged unit of yours holds its fire rather than loosing a volley at an enemy your side has not sighted, even one well within its bow’s reach — and a unit you put on Support won’t peel off to fire on, or chase, such an enemy near the ally it’s guarding either. Your own troops can’t newly shoot at, or newly give chase to, what your own fog is hiding from you. The same rule holds from the receiving end: enemy archers whose side has not sighted your unit are not loosing at it, so it doesn’t jog to get clear of that fire, or suffer the morale drain of missile fire it can’t answer. One disclosed exception: an attack already under way is not re-checked — a unit that has already committed to an explicit attack order keeps closing on and fighting that same target’s current live position even if your side’s perception of it later lapses. A replay reproduces the initial fog state and any mid-battle toggles on playback, exactly as recorded. Hills block line of sight completely (terrain occlusion), while forests screen vision and attenuate effective sight range. The ground itself carries its own explored/unexplored state, normally driven by your own units’ sight discs and independent of where enemies stand. Unexplored ground (never covered by a friendly sight disc) renders as an opaque dark fill. Ground your units have explored but can no longer see is dimmed. Ground currently inside a friendly sight disc renders normally. The one exception: ground under an enemy you currently see also renders normally, even where it falls just outside every friendly’s own sight-disc test. Seeing that enemy also marks the ground under it explored, so once the enemy moves on that patch stays dimmed rather than going back to the dark unexplored fill. Explored ground never reverts to unexplored, even if every unit marches away from it. For tactical guidance on scouting screens, ghost staleness, and pursuit decisions, see Tactics.
The battle loop
Here is the cycle in practice, shown with a cavalry charge:
- Select — left-click a unit, or drag a box to grab several at once. The info panel fills with the selected unit’s stats, including a flavor Commander rank (Centurion, Pilus Prior, Decurion, …) drawn from the real Roman officer hierarchy — cosmetic only, it has no effect on combat. Below the headline stats sit the live lines — each man’s hit points (the living average, its spread, and the type’s full-health value), the ordered gait with the unit’s own pace for it, and the block’s live mean speed and how fast that is changing — updating live as the unit marches and fights. The unit’s static characteristics sit below them behind a ▸ Characteristics toggle, folded up by default (click to expand): attack and defense; the armor type with its protection and weight (a legionary’s mail, a spearman’s linothorax, an archer’s padded tunic, a cavalryman’s scale shirt); each man’s body mass in kilograms; the weapon and shield types with their reach, lethality, block, and arc; and the mount (a cavalry regiment’s warhorse, with its own mass in kilograms and its pace — the horse’s bulk behind every charge). Every line carries a single stat, so the panel reads as one narrow top-to-bottom column. The panel’s Order section shows the unit’s active order and queued follow-up legs as a tree, with a cancel button (✕) on each top-level order to delete queued orders or interrupt the active maneuver.
- Order — right-click to send them. Move them onto an enemy’s flank, or right-click the enemy directly to attack. There is a brief reaction delay (~0.5 s, faster for cavalry) before units execute — orders aren’t instant. A unit you leave alone holds its formation: it stands and fights only an enemy that closes into its own weapon range, and won’t march off on its own to reach a foe it has merely spotted across the field. Send it forward with a move or attack order (or a March-to-contact / Chase stance — see Order stances) to close that gap. The AI-run enemy army still advances on its own, so the fight comes to you either way.
- Watch the bars — each unit flies a small regimental flag in its team colour and shows a strength bar that drops as it takes casualties. The flag is a click target too: clicking it selects the unit, just like clicking the block. Morale matters as much as numbers (see Tactics).
- Navigate terrain — the field has two terrain patches: a dark-green forest (slows movement to 60%) on the left flank, and a tan hill (impassable) on the right. Units route around the hill automatically, whether under your orders or fleeing a rout — and a routing unit boxed in with no way around stands to fight instead. See Tactics → Terrain. A unit will not march a whole block onto ground it cannot stand on, so an order to a point on the hill, or too close to the edge of the field, is amended or refused rather than carried out blindly. The unit halts short of the obstacle, or holds where it stands if nothing along the way is clear, and the HUD tells you so with a short message naming the unit, such as “Infantry 1: halting short of impassable ground” or “Infantry 1: no way through – holding”. Units under AI command, including a group you have delegated, do not show these messages.
- Exploit the break — when a unit routs, it flees (its flag fading) and stops fighting for now. Routs spread to nearby allies, so a single break can cascade. A fugitive that breaks contact can rally and reform back under your control at low morale, so chase down a broken enemy to finish it before it recovers — and give your own routers room to escape and rally.
- Win — destroy the entire enemy army (every unit dead, or fled clear of the map) and a Victory overlay appears, with Fight Again to restart. A routing enemy isn’t beaten yet: a “broken” one may yet rally, and even a “shattered” one (its nerve gone for good) still has to escape or be run down before it’s actually off the field.
Parade Ground
Select Parade Ground from the Main Menu for a solo drill: your own army deploys as usual, but no enemy spawns and the battle never auto-ends. Use it to freely rehearse formations, maneuvers, and orders without an opponent forcing the pace. Leave with ☰ Menu → Quit to Main Menu when you’re done — there’s no victory condition to trigger it for you.
All-Teams Control
Select All-Teams Control from the Main Menu for a real two-army battle where you command both sides directly — unlike Parade Ground, the enemy army still deploys as normal, but no AI ever issues it orders. Select and command either side’s units the same way you would your own; a right-click targets the OTHER side relative to whatever you currently have selected, so the same controls work switching back and forth between armies. Useful for rehearsing or verifying combat mechanics deterministically, without an opponent’s own AI decisions in the way.
Custom Battle
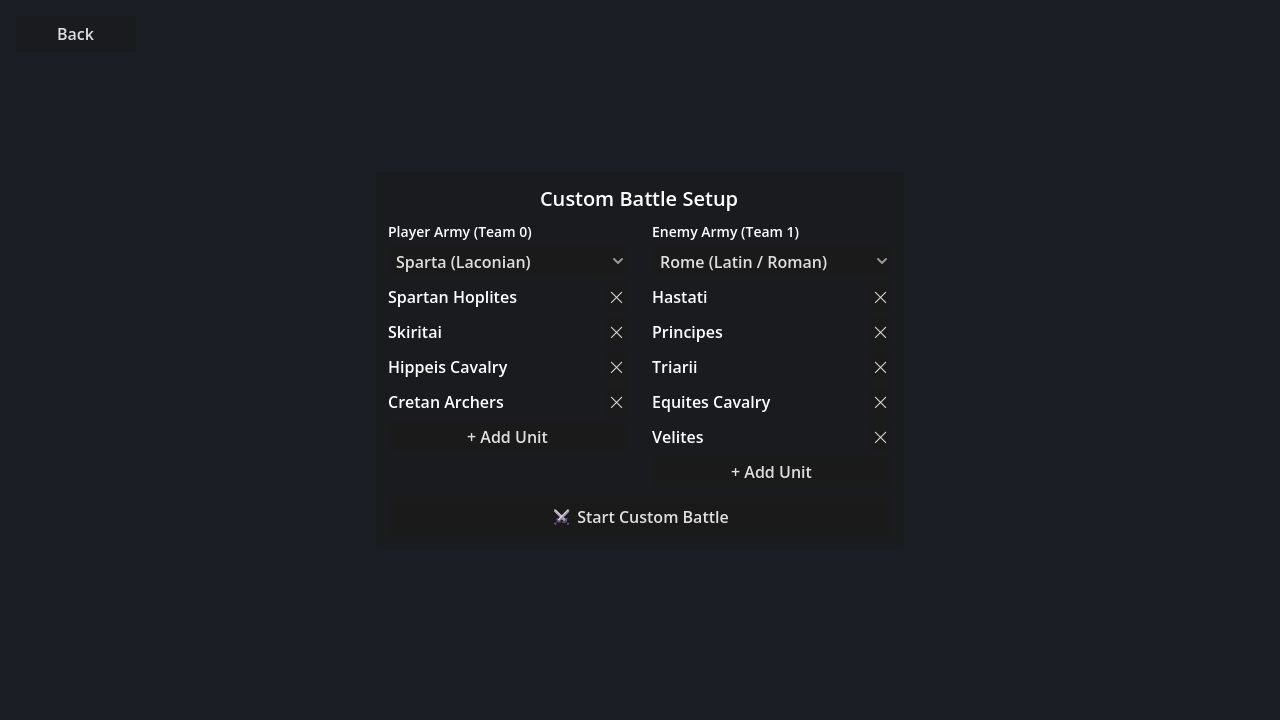
Select Custom Battle from the Main Menu to configure exactly which units face off, instead of the default line. Pick each side’s faction (Sparta, Rome, Carthage, or Macedon) from the dropdown — the roster below repopulates with that faction’s own historically-named units. Use + Add Unit to add more of a faction’s units, or the ✕ next to any entry to remove it, then ⚔ Start Custom Battle to deploy exactly that matchup. Each roster entry’s historical name (e.g. “Spartan Hoplites”, “Companion Cavalry”) resolves to one of the game’s four real unit types (Spearmen/Infantry/Archers/Cavalry) for its actual stats — the flavor name is presentation, the resolved type is what fights. Start is disabled while either side’s roster is empty, since a one-sided matchup would end the battle immediately.
Your faction names its own formations
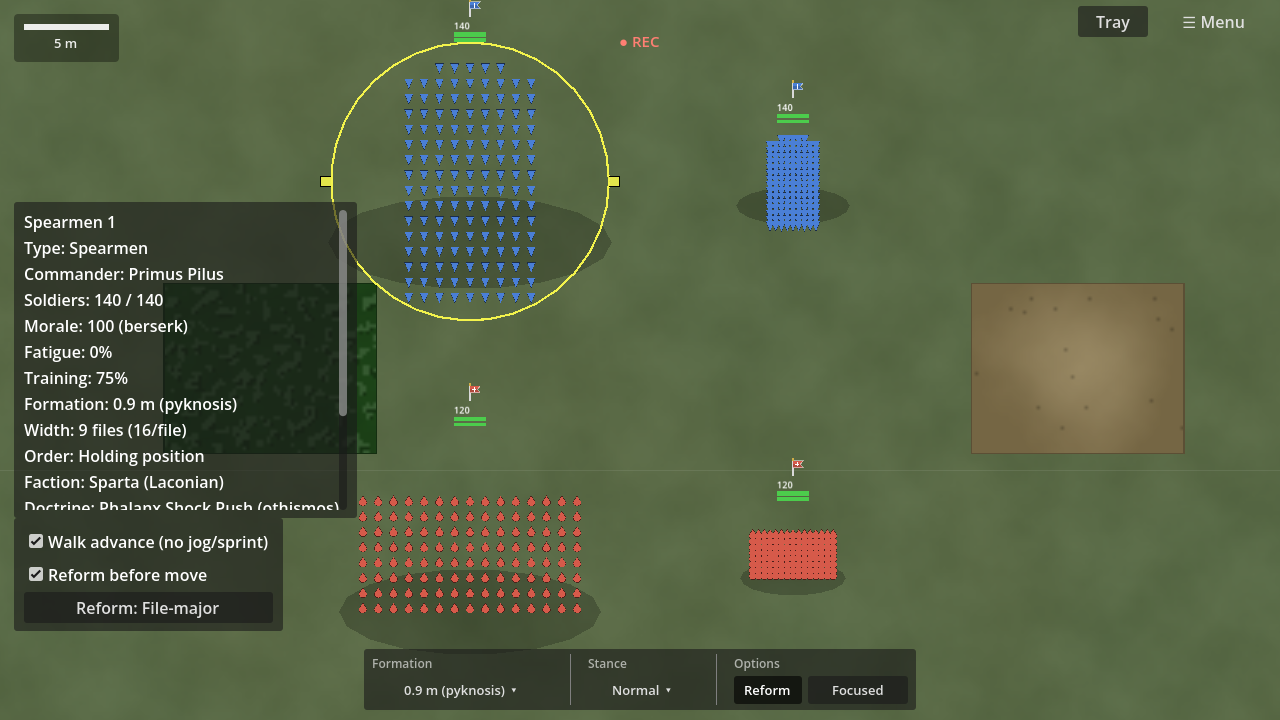
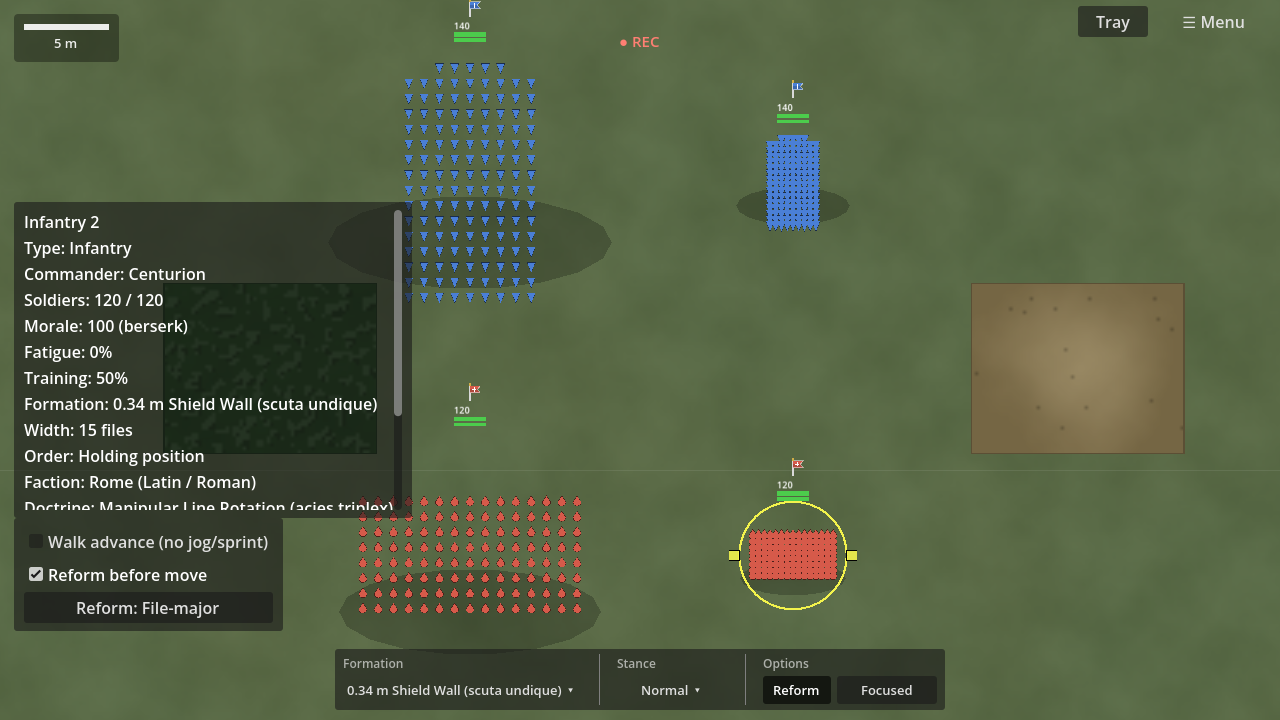
The faction you pick follows the army onto the field. Select any regiment and the control bar’s Formation button, its drop-up menu, and the info panel’s Formation line all name the stance the way that side’s own army did — so the same normal-order line reads pyknosis under a Spartan banner and acies under a Roman one, and the hollow anti-cavalry square reads plinthion or agmen quadratum. The Form-up section of the ☰ Menu does the same for the multi-unit drag-line splits your own army uses, and your side’s own word replaces the generic gloss rather than sitting beside it. The checkerboard item, whose plain label already carries Rome’s own name for the split, therefore reads that name unchanged under Rome and swaps in each other side’s own term under the others — never both at once. A split no faction has a name for keeps its plain label, as does every item in a battle fought under no faction at all. The words themselves live in HISTORICAL_FORMATIONS, HISTORICAL_FORM_UP, and FACTION_STRATEGIES in scripts/Faction.gd, which is where to read the current term for any given side and mode.
The info panel also gains two lines naming the side outright: Faction and Doctrine, the latter that army’s own named way of fighting — Sparta’s Phalanx Shock Push (othismos), Rome’s Manipular Line Rotation (acies triplex), Carthage’s Double Envelopment (Cannae), Macedon’s Hammer and Anvil (sarissa and hetairoi). The doctrine line is the side’s identity, not a behaviour switch: it does not change how the enemy AI fights.
Both lines sit below the live-state block — Formation, Width, Order — because neither changes once the battle starts. On a short window the panel scrolls, so the lines you read while giving orders stay above the fold and the identity pair is what falls below it.
Every caption follows the selected regiment’s own side, so under All-Teams Control you can select across the line and watch the same stance change language. Only the metric interval and stance carry meaning for the fight — the historical name beside it is flavor, and a battle started from anywhere but Custom Battle simply shows the plain caption.
Campaign Map
Sparta includes a turn-based campaign layer on top of its tactical battles. Select a scenario from the Main Menu to open the campaign map.
On your turn:
- Click one of your provinces (highlighted when you have an army there).
- Click an adjacent province to move, or attack an enemy one if you are at war.
- Press End Turn when you are done. Each AI faction takes its turn automatically.
The campaign clock. The top-centre readout is the campaign date — “Day 1, 00:00” when a scenario opens. It starts paused, and stays paused until you start it, so nothing moves while you read the map.
| Control | What it does |
|---|---|
| Resume / Pause button, or Space | Starts and stops campaign time. A paused date greys out and reads “(paused)” |
| Speed button | Steps to the next speed: 1x, 2x, 4x, 8x, then back to 1x, and resumes if time was paused |
| 1 2 3 4 | Picks that speed directly, and resumes if time was paused |
Speed changes how fast the days pass, never what happens in them, so the same moves play out identically at 1x and at 8x. Time freezes for the whole world while a tactical battle is fought and picks up where it left off when you return.
Turn order still decides who moves: the clock is the timeline the campaign layer’s later phases hang march times, supply, and truce expiry on, so for now it counts the days your war has run rather than pacing it.
Distances. Each campaign map carries a ground scale — so many metres to the map unit — rather than being measured in bare pixels, so a completed move reports how far the army marched — “Reinforced Cisalpina. (311.3 km march)” — in the same metric units the battlefield’s scale bar uses.
Deployment distance. A province’s data may declare how far apart the two armies deploy when a fight over it is fought out in the tactical battle. A clash over an open plain can open wider than the standard 18 m between the front ranks, so both armies start as far-tier marks and march before they fight. A province that declares nothing opens at the standard distance. See Deployment distance in the tactics guide.
Diplomacy: the right-hand panel lists every surviving rival. Click Declare War or Sue for Peace to change your stance. Suing for peace sets a truce that prevents re-declaring war for a few turns.
Rulers and AI personality: each faction is led by a named ruler whose trait shapes its diplomacy. The turn banner at top-left names the current faction’s ruler in parentheses (for example, Rome’s banner reads “Rome (Julius Caesar)”).
| Trait | War threshold | Peace threshold |
|---|---|---|
| Normal | Attacks at 1.5× strength advantage | Sues for peace below 0.6× |
| Aggressive | Attacks at 1.25× advantage | Fights longer (sues below 0.33×) |
| Defensive | Needs a 2× advantage to attack | Sues for peace sooner (below 0.8×) |
Province counts appear in the standings line below the banner. Own every province to win the campaign.
Recording & replays
Every battle is recorded automatically — a ● REC indicator shows top-center. When a battle ends it’s saved. Leaving early instead — Quit to Main Menu or Return to Campaign, including from a never-ending Parade Ground drill — offers a Save Replay? prompt first, so a mid-battle recording isn’t silently lost. Once a battle’s saved (either way), you can:
- Watch Replay — re-run the battle you just played (
▶ REPLAY). You can still pan and inspect units during playback, but can’t issue new orders. - Load Replay — open any earlier saved battle from a file picker (top-right, also on the end screen).
- Fight Again — start a fresh, newly-recorded battle.
See Replays for how the deterministic system works and why the logs are tiny.
Source: README.md in the repository.